Phena Bhaat and the definition of Bengali school-time breakfast

Often Bengalis are associated with regal breakfast dishes like a Sunday Morning Luchi Aloo’r Dom (Deep fried puffy bread and Spicy Bengali Potato Masala), Cholar Dal (Thick Lentils soup), Koraishutir Kochuri (Green Peas Kachori) or a Radha Ballavi (Lentil stuffed bread). In the legendary reputation of these elaborate breakfast preparations, Phena Bhaat (Bengali Rice Congee) is a buried treasure of the history of Bengali breakfast items.

The hurly-burly of New Year’s parties has finally mellowed down, garbage bags are overstuffed with disposable plates and cake frosting stains. And, as lame it might sound, we all wished we had binged-watched Ghost Stories on Netflix (Although I don’t recommend it now that I have watched it) when the world was bursting crackers in celebration of a New Year, a second chance, a Haridwar of time to cleanse all your sins and start afresh! Anyway, the point being, New Year’s been fun but it’s the day afters that’s disappointing. There is no zeal to ring out the old and bring in the new.

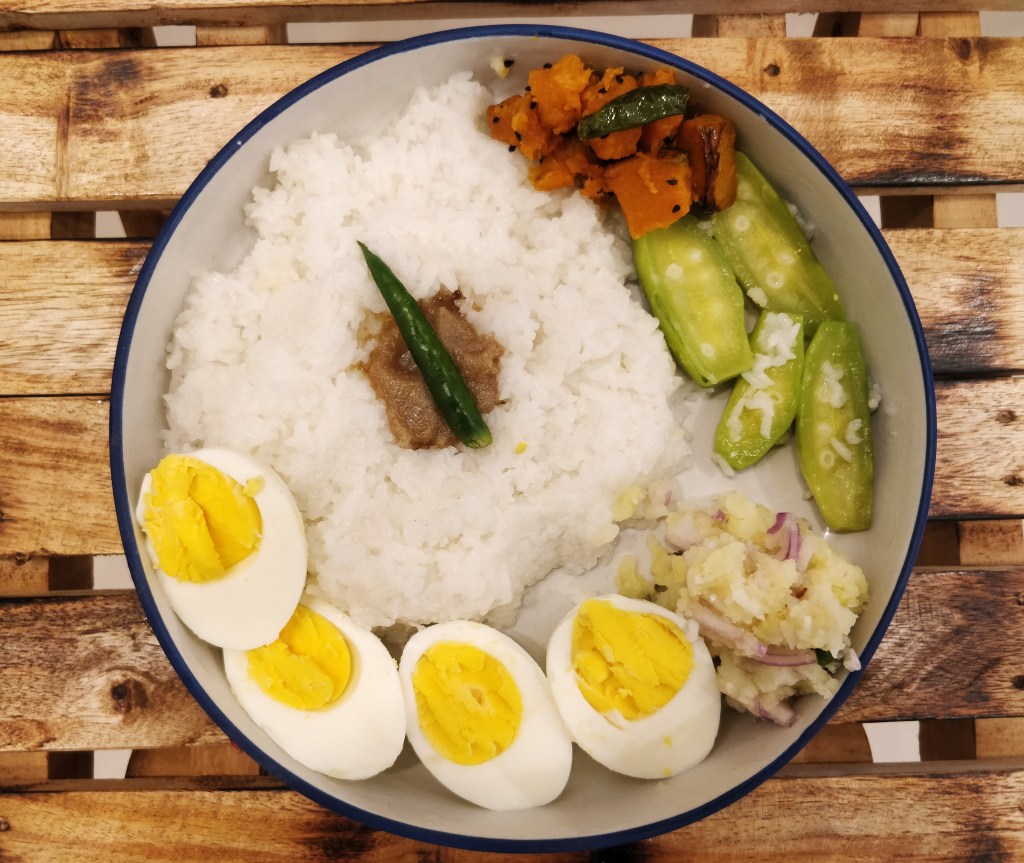
Maa, likewise, unwilling to visit the kitchen daunts us with hopelessness, “Is there a need for us to eat again?” Baba and I pull Maa close and tell her in our morning voice, “Chaaro naa. Shuye thaaki.” (“Don’t bother cooking! Sleep, please”). My mother, being a mother, pushes herself to the kitchen and runs a gamut in an all-in-one meal, Phena Bhaat. Call it a rice porridge or a starchy rice congee, Phena Bhaat is a one-pot meal with seasonal vegetables and served with bengali mashed potatoes, fried fish, boiled eggs and anything that you want to bring to the table. Maa serves Phena Bhaat for lunch with boiled veggies, pumpkin fry, alu seddho, boiled eggs and a mouthful of nostalgia. This comfort food wasn’t very soothing to my palate during my school days. Early in the morning getting ready for school, while Baba is tying up my shoe laces, Maa stuffs a morsel of ‘makhaa bhaat‘ (a culinary technique to muddle and mash the rice with other ingredients, typically by hand, to bring together a composite dish) in my mouth. I chew the food in disgust, slowly, to lower the pace of consumption and mostly because I did not like eating it. To lure me into eating it, Maa’er haather shaadh was not enough. Mom made several morsels of the bhaat-makha in a plate and named each one of them to make it interesting. It’s been 21 years and I still do not know what variety of pleasure Bengali kids derived out of eating their own family members in a gulp.

Phena bhaat also evokes memories of breakfast before an early morning travel. Seddho bhaat, a tighter, less liquefied version of Phena Bhaat is served as a comfort food with Bengali ghee (I say Bengali because it has a nutty, darker texture and my absolute favourite) & Aloo makha (Boiled potatoes) and a perfect accompaniment to keep your stomachs full yet light for the travel.

Yesterday when my Mom served me Phena Bhaat made with new, starchy Gobindho-Bhog rice accompanied with Alu-Potol-Dim Seddho, Misti Kumro Chokha, Kacha Lonka and Mayapur’er ghee, childhood was revisited and this time around, Maa did not have to name every morsel to make me eat it.

The recipe of a Phena Bhaat is pretty basic and predictable. However, if you need detailed instructions of the same, @bongeats has a detailed version of it on their youtube channel.

Phena Bhaat with Alu-Potol-Dim Seddho and Misti Kumro Chokha

If you liked this food story and want to see more of this mother-daughter duo, don’t forget to reach out to us at rannabaati00@gmail.com and our Instagram Handle @rannabaati by Oliva Das. We look forward to your requests and feedback!

How I met your Mother; oops I meant your perfect Sunday mutton curry.

As I write this blog today, a train of images rummages through my photographic mind.

An usual Sunday morning. A 6-year old me has the amnesty to wake up at 10 in the morning today without Maa screaming, “You’re going to be late for school!” Brushing can clock-watch its event for a while too, it’s a Sunday after all! Grandma is basking herself on the photons in a wooden armchair as she reads the newspaper. Yawning and rubbing my eyes, I sit on Thakuma’s lap to celebrate my kinda Sunday. Dad sets out to the Maagshor Bazaar (meat shop) with this bajaarer thola (jute bags for shopping vegetables) to catch hold of his favourite meat vendor to get the freshest meat. You see, the quality of the mutton is of premium importance. The tender (kochi), the better. Dad brings home the mutton and it’s an alarm for mother dear to arrange the ingredients for the cooking. My kaku (younger uncle) loves cooking and helps Maa to prepare the meat; cubing large-sized potatoes and smearing them with turmeric and salt. Maa does the arrangement and slyly adds a whole garlic into the setup to add to the mutton gravy (As it’s her personal favourite).

Thakuma starts cooking the mutton in a stove sitting in her armchair in the verandah and the rest is history. Patience, dedication, time and Grandma love. You do not compromise on that!

Over the years, Maa inherited Thakuma’s cooking skills and her area of expertise in a mutton recipe to keep the ball rolling in Das family. I could trace her lineage to the Maangshor Jhol but could not replicate whatsoever; until I cracked the one a few days back, the taste that I was lingering for in my mutton curry for several years.

A “I hit the century!” moment, I decided to share the recipe with everyone after much trials and attempts. Let me tell you, it is a basic Sunday mutton curry, you can add temper with the ingredients to your preferences based on the curry you’re making.

I have added a couple of pictures of the Mutton preparations that I have made and tempered with the method & ingredients slightly based on how I wanted it to turn out, but the basic method remains the same.

Pressure Cooker Mutton
(I added more water her for more gravy and cooked in pressure cooker for tender and juicy mutton)
Mutton cooked in a Nihari style (not a Mutton Nihari recipe) with additional spices (Nutmeg, Shah Jeera, Mace etc.)
Oil is extracted during the making of the gravy and served on top before consumption. Decorated with slit ginger and green chilies.
Bihari style Mutton to serve with Litti cooked in a Handi (clay pot).
Added half of a tomato chopped along with the other ingredients and cooked with the same ingredients without adding water. Added coriander leaves on top before serving.

Ingredients:

  1. Mutton – 1/2 Kg (A mixture of fatty, bony, boneless pieces)
  2. Onions – 1 finely julienne
  3. Garlic and coriander roots – freshly pounded with salt 1/2 tsp
  4. Onion paste – 2 tbsp
  5. Garlic paste – 1 tbsp
  6. Ginger paste – 1 tbsp
  7. Cumin paste – 1 tbsp
  8. Green chili paste – 1 tbsp
  9. Red chili paste – 1 tbsp
  10. Green chilies – 2 Slit
  11. Whipped yogurt – 3 tbsp
  12. Garam Masala Powder (Cardamom (4), Cinnamon (2), Cloves (3), Star Anise (1), Black peppercorns (4) – Dry roasted and grounded into a fine powder)
  13. Turmeric – 1 tsp
  14. Coriander Powder – 1 tsp
  15. Red Chili Powder – 1 tsp
  16. Jeera Powder – 1/2 tsp
  17. Bay leaves – 2
  18. Potatoes – 2 (cut into halves and smeared with turmeric, salt and red chili powder)
  19. Raw papaya paste (Optional for meat tenderizing, very popular method in Assam)
  20. Mustard Oil – 3/4 cup
  21. Sugar – 1 tbsp
  22. Salt to taste

Recipe:

  1. Marinate the washed and soaked mutton with yogurt, half portion of all the pastes mentioned in the ingredients, salt and 1/4th cup of mustard oil, massage all the pieces thoroughly and rest it for an hour (3 hours if you want best results) .
  2. Fry the marinated potatoes in mustard oil and keep it aside.
  3. In the same kadhai, add 2 bay leaves, 1/2 tsp of garam masala powder (mentioned in the ingredients) and remaining garlic-coriander paste and fry till the raw smell is gone.
  4. Add julienne onions and sugar and fry till the onions are golden brown.
  5. Once done, keep adding the remaining pastes one by one after an interval of a minute so that the pastes fries individually and is cooked evenly leaving no raw smell.
  6. Once the oil starts separating, add the marinated mutton cubes brushing the excess marinade, to the pan. Fry the mutton pieces till they are evenly fried.
  7. Now add rest of the marinade and start the slow cooking (koshano). At this point, you got to be patient. Leave it for a couple of hours (minimum 1 hour) and stir them occasionally to avoid burning at the bottom.
  8. Once your mutton is properly cooked and tender and you see the oil oozing from the masala, add 2 cups of warm water with desired amount of salt and 2 slit green chilies and let it cook on a medium-low flame for about 20 minutes.
  9. Adjust the seasoning if needed.
  10. Add the fried potato chunks at this point and sprinkle the garam masala.
  11. Once it’s ready, serve your Sunday Mutton curry with steamed rice, gondhoraj lebu (kaffir limes) and kaacha pyaaz (onions).

If you liked this recipe and want to see more of this mother-daughter duo, don’t forget to reach out to us at rannabaati00@gmail.com and our Instagram Handle @rannabaati by Oliva Das. We look forward to your requests and feedback!

Love Thy Neighbour; and their recipes – Dom Chingri Kosha

Dom Chingri Kosha

Husband and I recently moved to Kolkata hoping to spend the rest of his work years here. Having stayed in and around Assam for most of my married life, Kolkata is… new to me. Mostly intimidated by the new neighbourhood in my society, I enter my new home thinking, well, there’s always books to finish and Netflix subscription that my daughter paid for (chuckles), and probably that’s how my late 40s is going to be. One fine day, Vijoya Di rings the bell, introduces herself all thrilled and says, “Tumi carom khelo? Amader society club aache.” An instant yes, all smiles, I had made a new friend that day. One friend turns to four in no time and most of our evenings were spent beating the men in carom and TT in the clubhouse. It’s been a few months in Kolkata and although life is not the same as in Tezpur, I am gradually disarming my inhibitions and making this place my home.

This is the beautiful thing about Indian neighbours, you do not know when you become their own family – from being there in your wax and wanes, to sharing ‘dupurer maach’er jhol’ in tiffin boxes and bonding over shared recipes.

Here’s presenting you the first recipe from the blog. Lightly tossed prawns in a rich delectable gravy of caramelized onion gravy, with a smack of sourness from the curd and a peck of heat from the green chilies.

My daughter and I hope you love our simpler version of Dom Chingri Kosha!

Ingredients:

  1. Onion paste – 3 tsp (You can alternatively use 1.5 finely chopped onions)
  2. Cumin/Jeera powder – 1 tsp (Freshly pounded roasted jeera enhances the taste (and is also the cook’s secret)
  3. Coriander/Dhaniya powder – 1 tsp
  4. Red Chili Powder – 1/2 tsp (If you’re travelling to Rajasthan, buy their secret to their legendary Laal Maas – Mathania chilies; you’ll see the wonders yourself once you use ’em)
  5. Whipped Yoghurt – 5 tbsp
  6. Ginger- Garlic Paste – (2:1 ratio)
  7. Garam Masala Powder (If you’re making at home, more cardamom is always a bonus)
  8. Green chilli – 3/4 slit
  9. Salt to taste
  10. Sugar – 1 tbsp

Recipe:

  1. Marinate prawns in turmeric, salt and red chilli powder and fry them very lightly in a pan.
  2. Remove the prawns once done and temper the same oil with onion and ginger-garlic paste and sugar (helps in caramelizing the onions and adding colour to the gravy).
  3. In a bowl, mix all the spiced powder (mentioned in the ingredients together) and salt in lukewarm water to make a slurry and add them to the pan once the raw smell of the paste disappears.
  4. Wait until the oil separates from the thick gravy and then add whipped yoghurt slowly and steadily to the gravy to prevent lumps.
  5. At this point, be patient and do the ‘koshano’ i.e. wait for the gravy to release the aroma and oil oozes out from the gravy. Keep adding water from time to time to prevent the masala from burning.
  6. Once the ‘kosha’ is done, add lukewarm water and bring it to boil.
  7. At this point of time, add the green chilies and let the gravy do its work.
  8. Slide in the prawns (with the oil drippings!) into the gravy and cook for 5 mins.
  9. 4 mins into the gravy, add garam masala and let it cook for the rest of the time.
  10. Serve hot with steamed rice.

If you liked this recipe and want to see more of this mother-daughter duo, don’t forget to reach out to us at rannabaati00@gmail.com and our Instagram Handle @rannabaati by Oliva Das. We look forward to your requests and feedback!

Design a site like this with WordPress.com
Get started